Monday, February 7, 2011

(Pyrrhic) Victory!

Aftermath:

The day started badly. In the north the 81mm MTR was only able to place one Smoke counter in Z17. As a result, when the 9-2 was moving through hex Y13 the hidden 9-1 and Russian .50 cal HMG opened up from the upper level of CC19 with an 8 FP attack. Snake eyes; everybody dead. Yikes.

However, things quickly started looking up. My reconnaissance revealed a dug-in T70 in W18 and a HIP T-34 in U18. My first salvos of fire pretty much shattered the first line of the Russian defense. I was able to chase the tank out of the S17 factory and clear it of Russian defenders. As the Pioniers ground forward through the factories the sturm troopers pushed down behind them. I avoided activating any Reserve units and severely punished the Russian defenders. Two of the T-34s had been destroyed and the third was Immobilized and tied up in Melee with an 8-1 and an 8-3-8 when my opponent conceded on Turn 6. Two Stukas had just arrived, but they did not get a chance to take part.

This shows the furthest advance of the German forces and the approximate positions of the Russian defenders at the end of the game:

German troops had surrounded the AA25 building and were preparing to destroy everything inside it. There was nothing between the German line and the southeast corner of the map. If the game continued beyond Turn 6 the P33 factory would have been effectively surrounded and cut-off from possible reinforcement. The next campaign game day was going to feature at least one module of Heavy Artillery pounding the P33 factory while kill-stacks manned by 10-3s, 10-2s and 9-2s held off any counterattacks. With this looming the Russian conceded.

Important Factors:

1. Day One Rocket

The entire tone of this campaign game was set by the relative performance of the German and Russian Rocket Modules on Day One. The German Nebelwerfer drifted to the most optimal hex possible, and completely wrecked the Russian defenses in front of the Power Station. This allowed me to assert my armor and blow open the line. Taking the Power Station on Day One is not an easy task, and I was able to do it this time around.

Meanwhile, the Russian Katyusha just missed totally disrupting the entire northern half of my attacking force. Had it drifted in a more fortuitous direction - or, God forbid, drifted to an optimal hex - I would have been in real trouble. As it happened, though, the four points Dade spent on the Katyusha module were more or less wasted. Those points would have served the Russian much better were they spent on a Militia Coy or SMG Coy. Not buying those extra troops, and not extracting a heavy price from the German with the Katyusha, contributed greatly to the manpower shortage the Russian faced throughout the game.

2. Manpower Discrepancy

Usually in Red Barricades the German troops are superior in quality but badly outnumbered. When the German stages an attack, there is usually the threat of a Russian counterattack wherever the German is weakest. This threat helps keep the German honest and limits his options.

In this game I was able to continually maintain a numerical advantage over the Russian. This created a positive feedback loop: the Germans had more troops, which let them concentrate their firepower more effectively, which let them kill more Russians, which maintained the German numerical advantage.

In "normal" Red Barricades games the Russian force grows and grows until it's so huge that the German has no chance of beating it. Somehow I prevented this from happening and was able to win.

3. The Riverbank in CG I

The riverbank (i.e that section of the map east of hexrow U and north of hex coordinate 11, approximately) is a huge weight around the Russian's neck. He can't afford to leave it undefended, but at the same time the German has the option of completely ignoring it. This makes it very hard to invest resources to defend the riverbank, and very hard not to. When I finally took the Chemist's Shop (building W10) it opened the door for my Day Seven flank attack that won the game.

In CG III the riverbank must be addressed by the German, because it contains victory locations. Therefore any resources invested in long-term defense cannot be ignored by the German.

Next time...

Our next foray into the Barricades won't be for a while, but we are considering tackling CG III with some modifications:

  1. Ignore all modifiers to the CPP roll, except for historical modifiers.
  2. Ignore the CG balance provision, which awards negative modifiers to CPP rolls.
  3. Use armor redeployment rule from VotG rather than armor recall.
  4. Replace one or two Pioneer Coys with an equal number of Sturm Coys in the German OB
Our analysis is that the resource management phase of the CG contains a great number of subtle elements that pile up to make a German victory impossible. The modifications above are a starting point for a discussion regarding how to make CG III balanced. Maybe we will figure it out.

Wednesday, February 2, 2011

Live and Let Die


What does it matter to ya?
When you've got a job to do, you gotta do it well.
You gotta give the other fellow Hell!


Day Six: Aftermath


The day went essentially as planned.

In the North, my bold plan to knock out the forward-most T34 M41 failed. However I did achieve my Turn One objective: spur the Russian to move aggressively and expose himself. He drove his tanks into P4 and Q4 in an effort to put pressure on the machine gun nest in N5. When my Sturm Company entered on Turn Two, it caught the Russian completely flat-footed. One tank went down to a DC, the other to an ATMM in CC. With the tanks out of the way, the 5-4-8s pushed their way up the W and X hexrows and captured the Chemist's Shop without many casualties.

In the Center the Russians wilted under the massive firepower arrayed against them. I avoided risky moves (for the most part), using Assault Move and Advance to make my way forward. I knocked off six squads on Turn One and kept the pressure on. I made some headway and destroyed many squads, but the Russians were able to hold on to much of the terrain in this area. The hidden gun popped up at just the right time and prevented my troops from blowing a hole in the line.

In the South, however, I got whacked. I realized going in that I had defended this area lightly and was hoping the reinforcing Rifle Company would be able to shore things up. I did not count on the T34 M43s roaming so far into German territory. Dade drove them all the way down to the E hexrow, which put them in danger of isolation at the day's end. I hit them with about a half-dozen shots from the light mortars but did not generate an effect. I had two or three Streetfighting opportunities but could not cash in on any of them. As a result, the reinforcements were torn up and the original defenders in the P33 factory and the eastern housing complex were decimated.

In addition to all of that, I misplayed my artillery. My plan was to interdict any reinforcements entering from offboard, but I got distracted by the dug-in tanks. I almost scored big when a Flame was created in the rubble next to one of them, but then it extinguished itself. I did get lucky with a Critical Hit and blew up one of the T60s, but overall I would have preferred to disrupt the infantry.

As a result of the ground gained in the South, the Russians won the scenario. It is rare for the Russians to win in October, but I am not too worried. I laid a real hurt on the Russian. The final CVP tally was:

German: 110 CVP
Russian: 63 CVP

Not quite 2:1, but the sheer volume of casualties makes up for that. At the end of Day Six the Germans have a 2:1 manpower advantage over the Russian! I cannot recall any game of Red Barricades in which that has happened - the German is always outnumbered. I really can't explain how I have managed to create this situation. "Dumb luck" is all I got.

Day Seven: October 23, 1942

In the Refit Phase I battle-hardened five 4-6-7 squads and one 7-0 leader. The German ELR remained at 4, despite losing the scenario. German SAN remained at 2. I rolled [5-3=2] for CPP Replenishment and received 18 CPP.

Retained Forces:

1 x 10⁻³

2 x 10⁻²

1 x 9-2

1 x 9-1

7 x 8-1
3 x 8-0

1 x 7-0

1 x 6-1


20 x 5-4-8

1 x 2-3-8

13 x 4-6-8

1 x 2-4-8

4 x 4-6-7

1 x 2-4-7

6 x 4-4-7

1 x 2-3-6

1 x 2-2-8


5 x HMG
11 x MMG

7 x LMG

2 x Lt MTR
1 x Lt MTR(r)

1 x DC

1 x 81mm MTR


In addition, there was an isolated pocket containing:

1 x 7-0

1 x 5-4-8

1 x 4-6-7

1 x 2-3-7

1 x LMG


These forces will start play with Ammunition Shortage.


Purchases:

Pionier Coy, On-Map Setup [8-1=7 Full] (6-1=5: 9-2, 8-1, 7-0) 17 CPP

Stukas 1 CPP


Here is the Day Seven perimeter:

German perimeter in Blue (Isolated Pocket in Light Blue), Russian perimeter in Red, No Man's Land in Gray, Russian Reserve set-up limit in Yellow

I think Dade is expecting me to be fed up with his tanks by about now, and he's right. Nevertheless I opted not to purchase any AFV this day and sunk all my points into an on-map Pionier Company. Why do this? Well, I have a 2:1 manpower advantage and there will not be a better opportunity any time soon. In addition, I have GOT to tip the balance in the factories. I'm killing lots of Russians, but not making much headway. Pioniers are the best way to push the Russians back, and the 3 CPP spent to have them pushing from Turn One on (instead of spending 2-3 turns getting into position) is easily worth a platoon of PSW 221s, a battery of AT Guns or a module of Battalion Mortar.

I spent my remaining point on Stukas, in the hope that they enter early and harass Russian reinforcements.

Here is the Russian setup:


Analysis:

I expect that my opponent has purchased three Infantry Companies, and two of those have been set up in Reserve. He has no more Militia Companies to buy, so no purchased companies can set up inside the factory complex without paying an additional 2 CPP. I don't think he can afford to to do this, and expect the third company will enter as reinforcements.

He has clearly spent points on Fortifications, since the T34s are nowhere in sight. I also spy a cleverly-placed AT Ditch in O34 to prevent me from driving more tanks in through the vehicular entrance in P34. He also added another Trench in R32. Altogether that accounts for 43 FPP. I expect Dade purchased 80 FPP (2 CPP). Assuming he bought HIP for the maximum allowable number of squads (10% of 44.5 squad equivalents = 5), that would make an additional 15 FPP (58 total). Throw in a couple of HIP leaders and a few Fortified Buildings and he's at 80.

The Commissar's House is full of Reserve Cloaking counters, and I expect the bulk of whatever company they represent will be set up in this building. I would also expect the Heavy Weapons Platoon to be HIP upstairs somewhere, if not here then in the AA25 building. The approaches to the Commissar's House are suspiciously void of defenders (again).

I know he has a retained artillery module, presumably with pre-registered hexes somewhere over by the P33 factory. He may have purchased more artillery, but I think not. I think he spent his points on quality infantry.

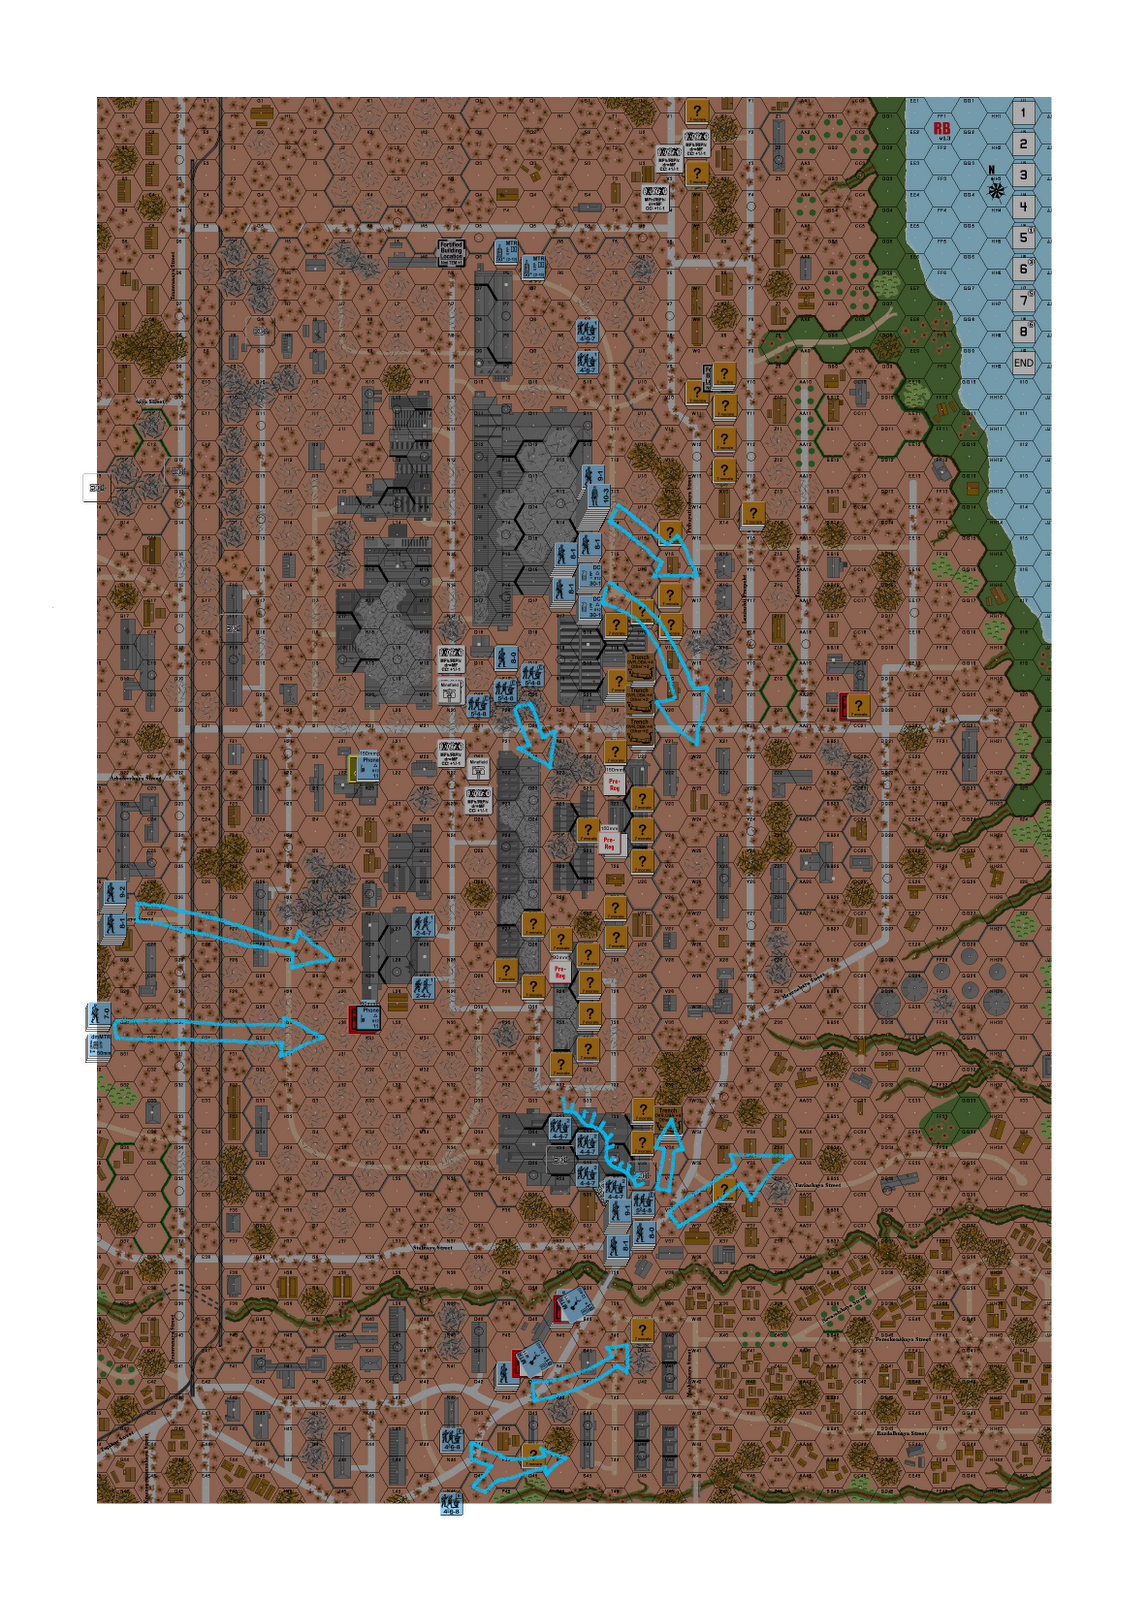
Here are my plans...

In the North:


Three half-squad and a 7-0 leader are tasked with mopping up the Strategic Locations in this corner of the map. There might be a hidden Russian counter-attack force lurking up here, and if so these guys will find it. I expect not, though, and I should be able to take control here.

In the Center (North):


I plan to completely avoid the Reserve units. Right now, I have a 2:1 manpower advantage. Activating Reserve units only reduces this. My objective is to isolate those Russians in the factory complex and destroy them all. As I mentioned previously, I am suspicious of the lack of defending units in hexes X15, X16, X17 and W18. I think that my opponent has set up his maximum allotment of HIP units, and I believe that some are in this building/rubble cluster.

The 81mm Mortar is set up on the roof of the Chemist's Shop and will try to put Smoke in AA18 and Z17. There is a Mild Breeze from the North that will drift the Smoke in front of the Commissar's House. After that, the mortar will spin and try to hammer the entrenched units in U19.

The stack in W14 has an important and probably lethal task. It consists of a 6+1 Leader, 3 x 2-3-7 and 1 x 2-3-6. These units will attempt to discover hidden Russians and draw their fire by entering every location in hexes X15, X16, X17, W18 and V17 on Turn One. If they don't get blasted by the .50 cal HMG from the Commissar's House or by a lurking 6-2-8 in the buildings they will be in good position to interdict reinforcements and prevent routing. If they do stumble into an ambush, better they get whacked than a 5-4-8.

The big stacks in the S17 factory will start shooting. The 8-0 has an 8-3-8 with a Flamethrower in his stack; they will clean up what the 10-2s don't break.

The 9-2 in X11 has two HMG. His job is to move into Y14 and prevent reinforcements from crossing Leninskii Prospekt. A platoon of 4-6-7s will provide flank protection for the machine gun nest.

The isolated units will take control of the buildings around CC10 then help out the 9-2

The remainder of the force will drive south along the V and X hexrows, cutting off the escape routes for the Russian units in the factories.

In the Center (South):


The objective in this area will be "KILL, CRUSH, DESTROY" as on the previous day. The 10-3 and the 9-2 will blast hexes T22 and T24 respectively. There is a good chance both Russian units will break allowing the Pioniers in hex S24 to Assault Move into T23, place a DC to Breach the interior factory wall and hose down the Russians in U23 with a Flamethrower in the Advancing Fire Phase. I am concerned that there may be a hidden T34 in S26. To allay my fears, I will use an 8-1 and 5-4-8 + LMG in R25 to shoot an 8+0 shot into S26. It will reveal the tank with any result (9 or less) and then an 8-3-8 will hit it with a Flamethrower. If nothing is there, the 8-3-8 will Assault Move forward.

The remaining units will simply blast what they can and take what ground is given. I do not plan on making a strong push toward the P33 factory early in this game; I will wait until I have overwhelming force.

In the South:


The light mortars on the rooftops in G33 and G34 will take as many pot-shots at the dug-in T60 in T31 as they can, hoping to get a cheap kill. Everyone else is to hold fast.

Overall:

Next game is scheduled for Saturday 2/5/11.

Thursday, January 20, 2011

Pig after pig, cow after cow, village after village, army after army...

This ain't no party, this ain't no disco, this ain't no foolin' around...

Day Five: Aftermath

This battle was much like the last: three yards and a cloud of dust, to coin an Americanism. My plan was to execute a pincer attack, enveloping the Russians in the factories so as to reduce them over time. It didn't go down like that.

The Germans encountered problems immediately. The 80mm artillery did pretty much nothing before the field phone gave out. In the south, the Russian had hidden a few 6-2-8s in exactly the right places to stop my advance in its tracks. I fought through them, and was barely able to get in position in front of the reinforcing Rifle Coy and its supporting tanks. There were Russian infantry squads behind me as well, so as soon as I got into position I had to start a fighting withdrawal from it. The net result is that things stayed essentially the same in the P33 factory: I had the southwest two-thirds and the Russian held the northeast corner.

In the middle of the map the 150mm artillery wandered all over the place, doing very little until late in the game when it landed on the trench complex. In the S17 factory things went very much as before, with the perimeter not changing very much. The 10-3 did manage to blow a normal morale check and leave a pile of machine guns for the Russians. Elsewhere not much happened until my reinforcing Rifle Coy arrived. They were able to force their way into the P21 factory and trade blows with the Russians there. It didn't seem like much was accomplished - the perimeter wasn't advanced very far - but I think I did some damage.

In the north, the Russians tried to push out of the Chemist's Shop into the northeast corner of the S11 factory. They didn't get very far, and the net effect was to create a Berserk 4-6-7 that charged the dug-in KV1 M42 and destroyed it in close combat.

When all the dust settled, the perimeter looked almost unchanged and the casualties were thus:

German: 63 CVP
Russian: 41 CVP

Just about a 3:2 ratio, barely acceptable. However, after the Refit Phase I retained 50.5 squad equivalents while the Russian retained 30.5 squad equivalents. I still have a squad advantage!

Day Six: October 22, 1942

In the Refit Phase I battle hardened five 4-6-7 squads and one 9-2 leader. The German ELR remained at 4; German SAN remained at 2. I rolled [4-4=0] for CPP Replenishment and received 18 CPP.

Retained Forces:

1 x 10⁻³

1 x 10⁻²

1 x 9-2

5 x 8-1

1 x 8-1 (wounded)

2 x 8-0

3 x 7-0


22 x 5-4-8

12 x 4-6-8

1 x 2-4-8

10 x 4-6-7

4 x 4-4-7

1 x 2-3-7

2 x 2-2-8
1 x 1-2-7

3 x HMG

8 x MMG

8 x LMG

3 x LtMTR

2 x ATR

1 x DC

1 x 80mm MTR


Purchases:
Sturm Coy [6-2=4 Full] (5-2=3: 10-2, 8-1, 7-0) 9 CPP

Rifle Coy [6-2=4 Full] (6-0=6: 9-1, 8-1, 8-0) 7 CPP

80mm MTR [6-2=4 Plentiful] 2 CPP


Here is the Day Six perimeter:

Russian perimeter in Red, German perimeter in Blue, No Man's Land in Gray, and the Russian Reserve Set-Up Line in Yellow

The Russian set-up looks like this:


Analysis:

My last two attempts at turning the corner on the Russians failed badly. (Why is there a voice in my head saying: "Precisely, Blackadder! That's why Ivan would never expect a third such attack!"). Sorry, but I have to decline. My opponent feels upbeat about his situation, but there are a few factors that I don't think he has considered fully:
  1. The Russian's are against the wall. They simply cannot retreat from the factories, because if they do, I win. They must stand toe-to-toe with my Sturm Troops, and given the superior German leadership and firepower, I think the 5-4-8s will win that fight.
  2. No more on-map setup. I presume that the Russian purchased the last of his available Militia Coy today. That means that going forward, no more units may be set up on-map for free. The extent of the German perimeter has also made it impossible for the Russian to set up in Reserve inside the victory area. From now on, the Russian will have to either pay an extra 2 CPP to set up an Infantry Coy on-map or bring reinforcements on from the board edge.
  3. I have a 20 squad advantage, and since I purchased two companies I will retain that advantage to the next day.
The window is still very much open for the German. I hope to be able to put together one or two good days and win the campaign.

The Russian set up has a few interesting features.

In the South:


I find it odd that Dade would stick at least three squads way off in the corner of the Housing Complex. I think these squads are there to prevent the Germans from encroaching on hex W45, which is a very useful place to enter reinforcing tanks.

I also find it odd that there is very little set up to the east of the P33 factory. In the last game, this is where the Russian ambushed my flanking attack. It seems likely that there are more units hidden here on Day Six. Backstopped by a dug-in T60, it would be a much harder task to attack in this direction.

Also, I know for a fact that there was a retained artillery module most likely aimed at the P33 factory. I haven't seen Dade reach for his large caliber artillery since Day One, and I'm a bit concerned that some 120mm OBA is waiting to land on me.

In the Middle:


I think that most of these units are Conscripts, with a few better-quality units sprinkled around to give them some spine. I know where one Gun is; it's in a Fortified Building hex in S20 and cannot be moved. The other one could be anywhere. I've marked in yellow some of the places that seem likely. The dug-in T60s in the south will be troublesome.

The North:


Once again, Dade has loaded up the Chemist's Shop but has left a wide-open lane to the Commissar's House. I don't know what to make of that, unless he intends to stage another diversionary attack to keep me busy in the P11 factory. The last one didn't pan out so well for the Russian. He appears much too week in the X14 - X19 building cluster, which makes me think another ambush is waiting for me there.

The German Plan:

I aim to avoid repeating my mistake. I am going to stay away from the dug-in tanks and I am not going to expose any flanks. My objective is to beat the Russian bloody.

In the South:

The objective here is to hold what I have and avoid taking chances. The observer for the 80mm OBA is on the rooftop in V40. His task is to interdict Russian reinforcements as they rush toward the P33 factory. I plan on dropping a spotting round in hex CC34 on Turn 1 and then see what happens on Turn 2. If no reinforcements come, then I will drop it on the dug-in tanks. The units south of the gully and those in the factory are going to hunker down and wait for elements of the reinforcing Rifle Coy.

In the Middle:

KILL. CRUSH. DESTROY. There is very little subtlety to this plan: line up my 5-4-8s with my best leaders and start hosing down anything that moves. I am taking a risk by putting the 10-3 on Level 2 in hex P18. From there, he can bring fire to bear on some very important Russian hexes such as R25, R27 and T23 - and, of course, all of the Chemist's Shop. However, this is a likely hex to be preregistered for artillery. I've studiously avoided such overwatch positions so far. Maybe my opponent will not expect me to use it today.

In the North:

The plan here is to try and draw the Russians out of their positions. I've lined up a bunch of squads out in the debris field. I hope to drop Smoke from the 80mm MTR on the tank in V8, then assault move a concealed 5-4-8 next to it. Assuming the 5-4-8 survives defensive fire and makes it's PAATC, I might be able to bag one of the T34s in close combat. If I can get one of them, the other will have to make task checks to move (owing to its lack of a radio). That won't be easy with an Inexperienced Crew. Meanwhile the 9-1 will be directing two MMG from the upper level of N5 and will ideally be able to break some of the units in the U5 area.

I plan on holding the reinforcing Sturm Coy off board until Turn 2. Hopefully the Russian will get aggressive and make a move toward the factories and out of his prepared positions. If I can maintain the element of surprise, my Sturm Coy with its 10-2 leader should be able to take the Chemist's Shop.

Friday, January 7, 2011

Crush Them Like Bugs


Once more into the breach...

(NOTE: This post will be somewhat abbreviated, as I only had a short time to prepare it prior to playing.)

Aftermath:

Day Three saw the Germans get their inevitable comeuppance. Russian resistance stiffened, and at long last Uncle Joe's Boys were able to get in their licks. The Rocket landed in R22 and broke it's share of conscripts, but other than that had little effect. The Battalion Mortar observer disabled his field phone with the first roll of the game, so I retained that module (but could have used it to good effect). The tanks took a beating. All in all, it was a grind-forward-one-hex-at-a-time kind of day. The final CVP tally was German: 56, Russian: 60. Ugh. I was able to carve out a toe-hold in the P24 factory and take control of about half of the P33 factory. I actually lost ground in the R17 factory, losing about half of it to a Russian counterattack.

Here is the perimeter after the day's activities:


Blue = German Perimeter; Red = Russian Perimeter; Gray = No Man's Land, Yellow = limit of Russian Reserve unit set-up

Day Four: October 20, 1942

In the Refit Phase I battle hardened one 4-6-7 squad and one 8-0 leader. The German ELR dropped to 3 and the German SAN remained at 2. I rolled [3-2=1] for CPP Replenishment and received 18 CPP.

Retained Forces:

1 x 9-2 Armor Leader
1 x 9-2
1 x 9-1
4 x 8-1
1 x 8-0
1 x 7-0

10 x 5-4-8
9 x 4-6-8
1 x 2-4-8
5 x 4-6-7
1 x 2-4-7
5 x 4-4-7
4 x 1-2-7
2 x 2-2-8

5 x HMG
7 x MMG
5 x LMG
1 x ATR
2 x Lt MTR
2 x 81mm MTR
1 x LMG(r)
1 x Pzkpfw IIIH [Immobilized: R35-T35; no BMG]
1 x 80mm Battalion Mortar Module

My depleted ELR was of concern. I decided to take an IDLE day, because the "0" Historical Modifier for the Russians meant that they could only purchase two infantry companies. I could also buy two, and thus keep pace with my opponent.

Purchases:

Sturm Coy in Reserve [9-0=8 Depleted] (10-3, 8-1, 7-0; no MMG, no DC, 1 LMG) - 8 CPP
Sturm Coy in Reserve [4-0=4 Full] (8-1, 8-0, 7-0) - 8 CPP
Carry Forward 2 CPP

Day Five: October 21, 1942

Thanks to the purchase of two Elite companies, my ELR recovered to "4" in the Refit Phase. The Immobilization was removed from the Pzkpfw IIIH and I removed a retained LMG to repair the tank's BMG. Of course, the tank was promptly Withdrawn along with the 9-2 Armor Leader. The retained Russian LMG was lost. I rolled [9-1=8] for CPP Replenishment and received 15 CPP.

Retained Forces:

1 x 10⁻³
1 x 9-2
2 x 9-1
5 x 8-1
3 x 8-0
2 x 7-0

31 x 5-4-8
9 x 4-6-8
1 x 2-4-8
5 x 4-6-7
1 x 2-4-7
5 x 4-4-7
4 x 1-2-7
2 x 2-2-8

5 x HMG
8 x MMG
7 x LMG
1 x ATR
2 x Lt MTR
2 x DC
2 x 81mm MTR
1 x 80mm Battalion Mortar Module

Purchases:

Rifle Coy [4-1=3 Full] (9-2, 8-1, 7-0) - 7 CPP
150 mm Heavy Artillery [8-1=7 Normal] - 6 CPP
Pre-Registered Hex (T22) for Heavy Artillery - 1 CPP
Pre-Registered Hex (T24) for Heavy Artillery - 1 CPP
Pre-Registered Hex (R28) for Battalion Mortar - 1 CPP
+1 SAN (to 3) - 1 CPP

The Plan:

I expect that the Russian will be bringing in some heavy hitters from the east board edge as reinforcements. There will probably be at least one, maybe two platoons of tanks which could either be hidden on-board or entering with infantry. There may also be some large-caliber artillery trained on what Dade presumes my jumping-off points.

My plan is to envelope the remaining pocket of factories, hopefully taking the fight behind the factory complex. Meanwhile, the Heavy Artillery will endeavor to smite those units remaining in the factories. The Rifle Company will rush up the gut to pressure the western approach. The Russian forces do not have the luxury of retreating - they have to stay in the factories or the game is over. If I am wildly successful I will completely isolate the factory complex.